Why? … Stop asking questions!
Background
In February 2017, we took our first shot at upgrading our old open-frame 6 GPU cracker (NVIDIA 970). It served us well, but we needed to crack 8 and 9-character NTLM hashes within hours and not days. The 970s were not cutting it and cooling was always a challenge. Our original 8 GPU rig was designed to put our cooling issues to rest.
Speaking of cooling issues, we enjoyed reading all of the comments on our 2017 build. Everyone seemed convinced that we were about to melt down our data center. We thank everyone for their concern (and entertainment).
“the graphics cards are too close!”
“nonsense. GTX? LOL. No riser card? LOL good luck.”
To address cooling, we specifically selected (at the time) NVIDIA 1080 Founders Edition cards due to their ‘in the front and out the rear’ centrifugal fan design. A couple months after our initial blog, we upgraded from NVIDIA 1080 to NVIDIA 1080 Ti cards. And admitedly, we later found that more memory was useful when cracking with large (>10GB) wordlists.
OK, But Why?
Shortly after building our original 8 GPU cracker, we took it to RSA and used it as part of a narrated live hacking demo. Our booth was a play on the Warlock’s command center where we hacked Evil Corp from the comfort of Ma’s Basement. (yeah, a bit unique for RSA…)

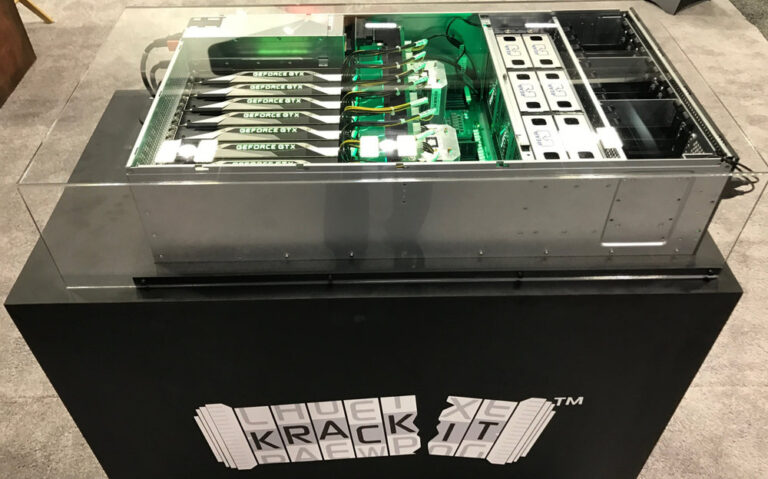
Kracken 3 – RSA Debut
Our 1st 8 GPU rig built in February 2017
Shopping List
You have a little flexibility here, but we’d strongly suggest the Tyan chassis and Founders Edition NVIDIA cards. The Tyan comes with the motherboard, power supplies (3x), and arrives all cabled up and ready to build. We went with a 4TB SSD to hold some very large wordlists but did not setup RAID with a 2nd drive (yet). Higher CPU speeds and memory mostly help with dictionary attacks; therefore a different build may be better suited for non-GPU cracking.
Hardware
- Tyan B7079F77CV10HR-N
- 2x Intel Xeon E5-2630 V4Broadwell-EP 2.2 GHz (LGA 2011-3 85W)
- Be sure to get V3 or V4 (V4 recommended to support DDR4 2400 RAM)! *We learned the hard way!
- 128GB (4 x 32GB) DDR4 2400 (PC4 19200) 288-Pin 1.2V ECC Registered DIMM
- Samsung EVO 4TB 2.5” SSD
Software
- Ubuntu– 18.04 LTS server (x64)
- hashcat– www.hashcat.net
- hashview– www.hashview.io
Cost
- Depends heavily on the current market price of GPUs. ($12K-$17K)
- At least the software is all free! And who can put a price on cracking performance?
The Build
Despite being a hash munching monster and weighing nearly 100 lbs. when assembled, this build is easy enough for novice.

Tyan B7079F77CV10HR-N
Hardware Build Notes
- Normally I like to install the CPU(s) first, but I ordered the wrong ones and had to install them 3 days later. Be sure to get V3 or V4 XEON E5 processors, V2 is cheaper but ‘it don’t fit’.
- When installing the (included) Tyan heat-sinks, we added a little extra thermal paste even through the heat-sinks already have some on the bottom.
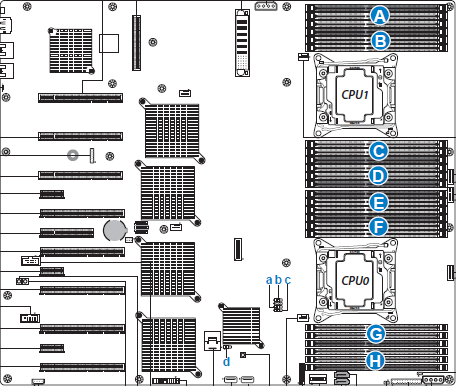
- Install memory starting in Banks A and E (see diagram above). CPU 0 and CPU 1 each require matching memory. Memory Banks A-D are for CPU 0 and Memory Banks E-H are for CPU 1. We added 2x 32GB in Bank A and 2x 32GB in Bank E for a total of 128GB RAM.
- Install hard drive for (Linux) operating system. We chose a 4TB SSD drive to ensure plenty of storage for large wordlists and optimum read/write performance. The chassis has 10 slots so feel free to go crazy with RAID and storage if you wish.
- Prep all 8 GPU cards by installing the included Tyan GPU mounting brackets. They are probably not required, but they ensure a good seat.
- Install GPU cards. Each NVIDIA 1080 Ti requires 2 power connections per card. The regular 1080 cards only require 1 if you decide not to go the ‘Ti’ route. Again, Tyan includes all necessary power cables with the chassis.
- Connect or insert OS installation media. I hate dealing with issues related to booting and burning ISOs written to USB flash; so we went with a DVD install (USB attached drive).
- Connect all 3 power cords to the chassis and connect the other end of each cord to a dedicated 15A or 20A circuit. While cracking, the first 2 power supplies draw 700-900W with a less on the 3rd. They do like dedicated circuits though, it is easy to trip breakers if anything else is sharing the circuit.
Software Build Notes
Everyone has their own preferred operating system and configuration, so we’ve decided not to go telling you how to do your thing. If you are new to installing and using a Linux operating system, we did include a complete walk-through in our post: How to build a 8 GPU password cracker.
The basic software build steps are as follows:
- Install your preferred Linux OS. We chose Ubuntu 18.04 LTS (64 bit – server). Fully update and upgrade.
- Prepare for updated NVIDIA drivers:
- Blacklist the generic NVIDIA Nouveau driver
sudo bash -c “echo blacklist nouveau > /etc/modprobe.d/blacklist-nvidia-nouveau.conf”
sudo bash -c “echo options nouveau modeset=0 >> /etc/modprobe.d/blacklist-nvidia-nouveau.conf”
sudo update-initramfs -u
sudo reboot
2b. Add 32-bit headers
sudo dpkg –add-architecture i386
sudo apt-get update
sudo apt-get install build-essential libc6:i386
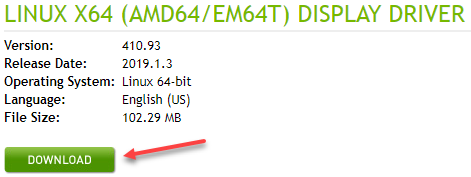
2c. Download, unzip and install the latest NVIDIA driver from http://www.nvidia.com/Download/index.aspx

sudo ./NVIDIA*.run
sudo reboot
- Download and install hashcat from https://hashcat.net/hashcat/
- (Optional) Download and install hashview from http://www.hashview.io/
The Outcome
Go ahead, run a benchmark with hashcat to make sure everything works!
./hashcat-5.0.0/hashcat64.bin -m 1000 -b
@njoyzrd


